
Meta Description: Master the art of Hasselback potatoes with this easy recipe. Crispy edges, creamy centers, and stunning presentation for any occasion.
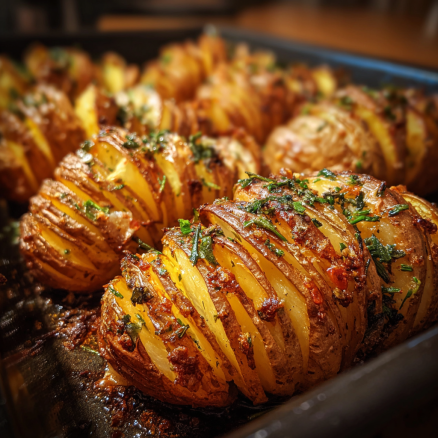
There’s something mesmerizing about Hasselback potatoes. The perfectly fanned slices. The crispy edges that catch the light. The way butter pools in every crevice. They look like something from a five-star restaurant, yet they’re surprisingly simple to make at home.
These aren’t your average baked potatoes. The accordion-style slicing creates dozens of thin layers that crisp beautifully while the interior stays creamy. Each slice acts like a little flavor pocket, soaking up butter, herbs, and seasonings.
The best part? This gourmet potato side dish looks incredibly impressive but requires just basic ingredients and techniques. No culinary school needed. Just potatoes, a sharp knife, and a little patience.
Whether you’re planning a special dinner, hosting holiday guests, or simply want to elevate Tuesday night’s chicken, crispy Hasselback potatoes deliver restaurant-quality results. They’re comfort food that feels fancy. They’re simple cooking that looks sophisticated.
Let’s master this Swedish classic together and transform the humble potato into something extraordinary.
What Are Hasselback Potatoes?
A Swedish Classic
Hasselback potatoes originated at Restaurant Hasselbacken in Stockholm, Sweden, back in the 1940s. A creative chef discovered that slicing potatoes almost all the way through created maximum surface area for crisping.
The technique caught on and spread beyond Sweden. Today, home cooks worldwide make their own versions. The basic principle remains the same: thin slices, generous butter or oil, and high-heat roasting.
What makes them special isn’t complicated ingredients or techniques. It’s the transformation that happens in the oven. Simple potatoes become architectural. Everyday ingredients create something visually stunning.
Why They’re Better Than Regular Baked Potatoes
Traditional baked potatoes have limited surface area. The skin crisps, but most of the potato stays soft. Hasselback potatoes recipe multiplies the crispy surface area exponentially.
Each slice edge becomes golden and crunchy. The spaces between slices catch butter and seasonings. Every bite delivers that perfect ratio of crispy to creamy.
The fanned appearance also makes them naturally elegant. They look like you spent hours on presentation. But really, it’s just smart slicing and proper roasting technique.
The Perfect Balance
These potatoes bridge the gap between comfort food and fine dining. They’re fancy enough for holiday tables. Easy enough for weeknight dinners. Impressive enough for dinner parties. Comforting enough for family meals.
This versatility makes them invaluable in your cooking repertoire. One recipe adapts to countless occasions. Master it once, use it forever.
Essential Ingredients and Tools
The Foundation
For Classic Hasselback Potatoes:
- 4 to 6 medium russet or Yukon Gold potatoes
- 4 tablespoons butter, melted (or olive oil for dairy-free)
- 2 tablespoons olive oil (helps with browning)
- 4 cloves garlic, minced (optional but recommended)
- 1 teaspoon salt (kosher or sea salt)
- 1/2 teaspoon black pepper
- Fresh herbs for garnish (thyme, rosemary, or parsley)
- Optional: grated Parmesan, breadcrumbs, or bacon bits
Potato selection matters. Russets are classic—starchy and fluffy inside. Yukon Golds offer buttery flavor and creamier texture. Both work beautifully. Choose based on your preference.
Quality butter makes a difference. It’s a primary flavor, not just cooking fat. Use real butter, not margarine. Your taste buds will thank you.
Tools You’ll Need
Essential Equipment:
- Sharp chef’s knife (crucial for clean, even slicing)
- Two wooden spoons or chopsticks (for slicing guides)
- Baking sheet or roasting pan
- Pastry brush (for applying butter)
- Aluminum foil (optional, for tenting)
The knife must be sharp. Dull knives slip and cut unevenly. They’re also more dangerous. Sharpen before you start for best results.
The wooden spoons act as cutting guides. They prevent you from slicing all the way through the potato. This simple trick makes the technique foolproof.
Step-by-Step Slicing and Roasting Guide
Preparing the Potatoes
Scrub potatoes thoroughly under cold water. Don’t peel them. The skin adds structure and becomes deliciously crispy during roasting.
Pat completely dry with paper towels. Moisture prevents browning. Dry surfaces crisp better. This step seems minor but matters significantly.
Preheat your oven to 425°F. High heat is essential for achieving those crispy edges. Lower temperatures just dry the potatoes without creating proper texture.
The Slicing Technique
Place a potato on your cutting board. Position wooden spoons or chopsticks parallel to each other on either side of the potato. These act as safety rails for your knife.
Starting at one end, make thin slices across the potato—about 1/8 to 1/4 inch apart. Cut straight down. The wooden spoons stop the knife before it cuts all the way through.
Continue slicing along the entire potato. The slices should stay connected at the bottom. The potato should fan slightly but remain intact. If it separates completely, don’t worry—it will still taste great.
Repeat with remaining potatoes. Take your time. Precision here creates better results. Rushing leads to uneven slices and potentially cut-through potatoes.
First Stage of Roasting
Mix melted butter with olive oil in a small bowl. Add minced garlic if using. This mixture is your flavor base.
Place sliced potatoes on a baking sheet. Use a pastry brush to generously coat each potato with the butter mixture. Get butter between the slices. This takes patience but creates incredible flavor.
Season liberally with salt and pepper. The seasonings should coat both the tops and get into the crevices. Don’t be shy with salt—potatoes need it.
Roast for 30 minutes uncovered. The potatoes will start softening and the slices will begin separating and fanning out naturally.
Second Stage: Crisping
After 30 minutes, remove from the oven. Brush with more butter mixture. The slices have opened up, so you can get more butter deep into the potato now.
Return to the oven for another 30 to 40 minutes. The slices should turn golden brown and crispy. The edges might get dark brown—that’s perfect. Those are the most delicious bits.
Test doneness by inserting a knife into the thickest part. It should slide through easily with no resistance. The interior should be fluffy and tender.
Final Touches
Remove from the oven when deeply golden. Let rest for 5 minutes. This allows the starches to set slightly. The potatoes will be easier to handle and transfer.
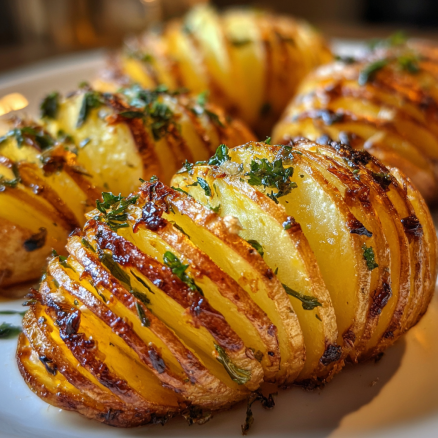
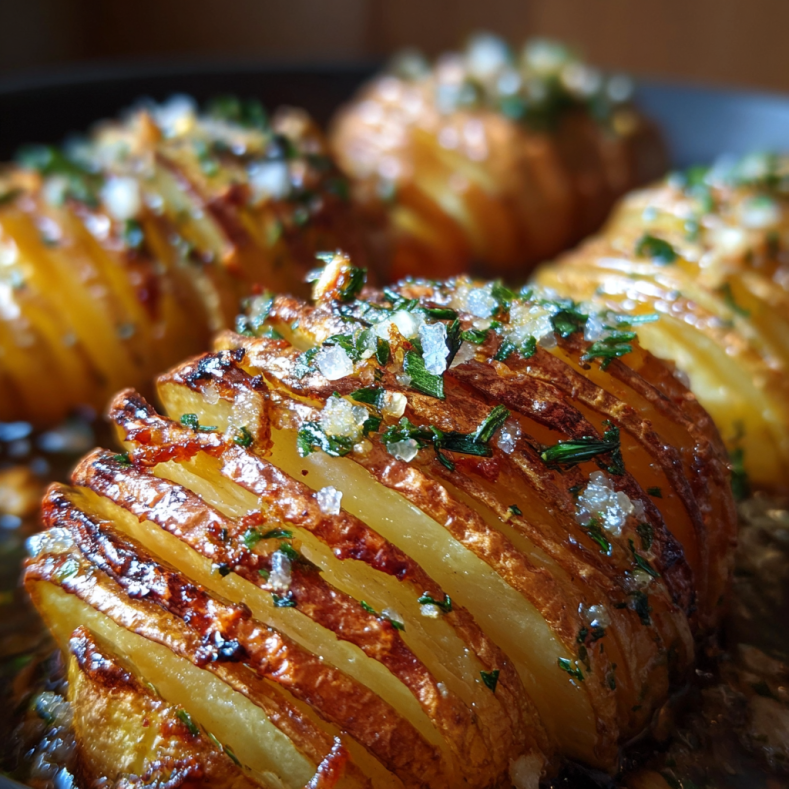
Garnish with fresh herbs, extra salt, or any finishing touches you like. Serve immediately while the edges are still crackling crispy.
Delicious Flavor Variations
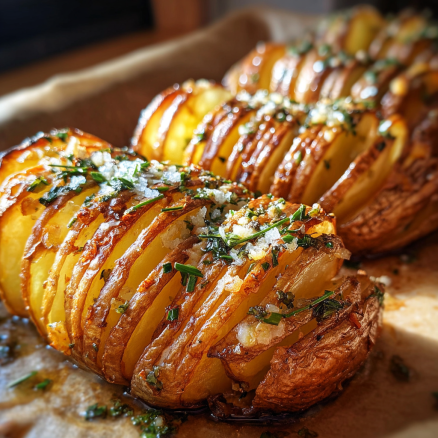
Garlic Butter Hasselback Potatoes
Double the garlic in your butter mixture. Add fresh minced garlic between slices during the second basting. The garlic mellows and caramelizes during roasting.
After baking, toss with roasted garlic butter. Mash roasted garlic cloves into softened butter. Brush this over the hot potatoes. The combination is heavenly.
Finish with fresh parsley and a sprinkle of flaky sea salt. This version pairs beautifully with steak or roasted meats.
Loaded Hasselback Potatoes
After roasting, top like loaded baked potatoes. Add shredded cheddar cheese and return to the oven briefly to melt. The cheese drips into all those crevices.
Top with crispy bacon bits, sour cream, and chopped chives. Each potato becomes its own complete side dish. They’re substantial enough to be a light meal.
For extra indulgence, add a dollop of sour cream mixed with horseradish or chives. The cool, tangy cream contrasts perfectly with the hot, crispy potato.
Parmesan and Herb Version
Mix grated Parmesan with breadcrumbs. During the last 15 minutes of roasting, sprinkle this mixture over the potatoes. It creates an extra crispy, flavorful crust.
Add fresh rosemary and thyme to your butter mixture. The herbs infuse every slice with aromatic flavor. The combination of Parmesan and herbs tastes distinctly Italian.
Finish with a squeeze of lemon juice and more fresh Parmesan. The brightness cuts through the richness perfectly.
Spicy Hasselback Potatoes
Add cayenne pepper or red pepper flakes to your butter mixture. Start with 1/4 teaspoon and adjust to your heat preference.
After roasting, drizzle with hot honey or sriracha butter. The sweet-heat combination is addictive. These pair wonderfully with grilled chicken or fish.
Top with fresh cilantro instead of parsley for a southwestern twist. Add a lime wedge on the side for squeezing.
Serving Ideas for Every Occasion
Elevated Weeknight Dinners
Serve crispy Hasselback potatoes alongside simple grilled steak or chicken. The potatoes elevate the entire meal without requiring extra effort. They make Tuesday feel special.
Pair with roasted vegetables and a simple salad. The potatoes are substantial enough that you need fewer side dishes. One or two accompaniments create a complete, satisfying plate.
They’re especially wonderful with pan-seared salmon or pork chops. The crispy potato texture contrasts beautifully with tender protein. Simple meals feel restaurant-worthy.
Holiday and Special Occasion Tables
This easy holiday potato recipe impresses every time. The visual appeal makes them perfect for Thanksgiving, Christmas, or Easter dinners. They look festive and intentional.
Make individual potatoes for each guest. Everyone gets their own perfectly cooked, beautifully presented potato. No carving or dividing required. The individual portions feel special and thoughtful.
They pair beautifully with traditional holiday proteins. Roast turkey, honey-glazed ham, or prime rib all benefit from this elegant potato side. The potatoes hold their own without competing.
Dinner Party Show-Stoppers
When hosting, serve these as your gourmet potato side dish. Guests always comment on their beauty. The fanned presentation sparks conversation and compliments.
Prepare multiple flavor variations. Let guests choose their favorite. Garlic butter, loaded, and herb versions create a potato bar effect. It’s interactive and fun.
The make-ahead potential (see below) means you’re not stressed during the party. Prep early, finish in the oven while guests arrive. They emerge perfectly timed with dinner.
Storage and Reheating Tips
Storing Leftovers
Let potatoes cool completely before storing. Place in an airtight container. They keep for 3 to 4 days in the refrigerator.
The crispy texture softens during storage. This is unavoidable with any crispy food. Proper reheating can restore much of the texture.
Store with parchment paper between layers if stacking. This prevents them from sticking together and makes reheating easier.
Reheating for Best Results
The oven yields the best reheating results. Preheat to 400°F. Place potatoes on a baking sheet. Heat for 15 to 20 minutes until crispy again and heated through.
You can add more butter or oil before reheating. This helps restore crispiness. Brush lightly over the slices before putting in the oven.
An air fryer works wonderfully too. Set to 375°F and cook for 10 to 12 minutes. The circulating air crisps the edges beautifully. This method is faster than the oven.
Avoid the microwave. It makes them soggy and rubbery. If you must use it, microwave briefly then finish in a hot oven to restore texture.
Make-Ahead Strategy
You can slice potatoes several hours ahead. Keep them in cold water to prevent browning. Drain and pat completely dry before roasting.
For maximum convenience, slice and arrange on the baking sheet. Cover tightly and refrigerate for up to 4 hours. When ready, brush with butter and roast as directed.
Don’t try to fully cook them ahead. Reheated Hasselback potatoes never match freshly roasted ones. The timing is manageable enough to cook them day-of for any occasion.
Pro Tips for Perfect Results
Use a mandoline carefully. Some cooks use a mandoline with the safety guard for ultra-thin, even slices. This creates maximum crispiness. Just be extremely careful—mandolines are sharp.
Don’t skimp on butter. Generous butter application creates those golden, crispy edges. It also carries flavor into every crevice. This isn’t the time for moderation.
Rotate the pan halfway through. Even ovens have hot spots. Rotating ensures even browning and prevents burning on one side.
Fan the slices apart. After the first 30 minutes, gently pull slices apart with a fork. This helps them crisp individually rather than staying stuck together.
Season at multiple stages. Salt and season before roasting, after the first 30 minutes, and again when serving. Layered seasoning creates deeper flavor.
Conclusion: Fancy Made Simple
Hasselback potatoes recipe proves that impressive doesn’t mean complicated. A few smart techniques transform ordinary potatoes into something extraordinary. The results look like hours of work but require minimal actual effort.
The crispy edges, creamy centers, and stunning presentation make these potatoes suitable for any occasion. Weeknight dinners. Holiday feasts. Dinner parties. Date nights. They adapt seamlessly to every situation.
Once you master the slicing technique, you’ll make these again and again. They’re too easy and too impressive not to. Your dinner guests will think you’re a culinary genius. You’ll know the truth—it’s just smart cooking.
So grab some potatoes and a sharp knife. Set aside an hour. Create something that looks gourmet, tastes incredible, and requires nothing but basic skills and ingredients.
Comfort food just got elegant. And you’re the one who made it happen.
Frequently Asked Questions
What kind of potatoes are best for Hasselback?
Russet potatoes are the traditional choice. Their starchy texture becomes incredibly fluffy inside while the slices crisp perfectly. They’re also large enough to create impressive presentations.
Yukon Gold potatoes work beautifully too. They’re slightly waxy with buttery flavor. Their creamy texture is delicious. They hold their shape well and slice easily.
Avoid new potatoes or very small varieties. They’re too small to slice effectively. You need medium to large potatoes that can accommodate many thin slices.
Look for potatoes that are uniform in size. This ensures even cooking. If mixing sizes, separate them and adjust cooking times accordingly.
How do I slice evenly without cutting through the potato?
Use wooden spoons or chopsticks as guides. Place them parallel on either side of the potato. When you slice down, the utensils stop your knife before cutting through completely.
Choose spoons or chopsticks that are the same height. This ensures your knife stops at a consistent depth. Consistency creates better results.
Make your slices thin—about 1/8 to 1/4 inch apart. Closer slices create more surface area for crisping. They also look more impressive when fanned out.
Take your time. Rushing leads to mistakes. Fifteen seconds of care per potato creates much better results than hurrying and cutting through.
Can I make Hasselback potatoes ahead of time?
You can slice them several hours ahead. Submerge in cold water to prevent oxidation and browning. Drain and dry thoroughly before roasting.
You can also slice and arrange on the baking sheet. Cover tightly with plastic wrap. Refrigerate for up to 4 hours. Brush with butter and roast when ready.
Don’t fully cook them ahead. They lose their crispy texture when reheated. The timing is manageable enough to cook them fresh for any meal.
For parties, do the slicing early. Pop them in the oven about an hour before serving. They’ll be ready perfectly timed with the rest of your meal.
Can I air fry Hasselback potatoes?
Yes! Air frying creates excellent crispy Hasselback potatoes. Slice and brush with butter as directed. Place in the air fryer basket without overcrowding.
Set to 375°F and cook for 40 to 50 minutes. Brush with more butter halfway through. The circulating air crisps every slice beautifully.
You may need to work in batches. Don’t crowd the basket. Proper air circulation is essential for even crisping and cooking.
The air fryer is faster than the oven and keeps your kitchen cooler. It’s perfect for summer cooking or smaller batches.
What toppings go best on Hasselback potatoes?
Classic toppings include sour cream, chives, bacon bits, and shredded cheese. These create a loaded baked potato effect. They’re rich and satisfying.
Fresh herbs like rosemary, thyme, or parsley add freshness without heaviness. They complement rather than overwhelm the potato flavor.
Grated Parmesan adds nutty, salty richness. Mix with breadcrumbs for extra crunch. This combination creates an irresistible crispy topping.
For something different, try everything bagel seasoning, truffle oil, or compound butter. Get creative. The fanned slices catch and hold any topping beautifully.